Search Our Site
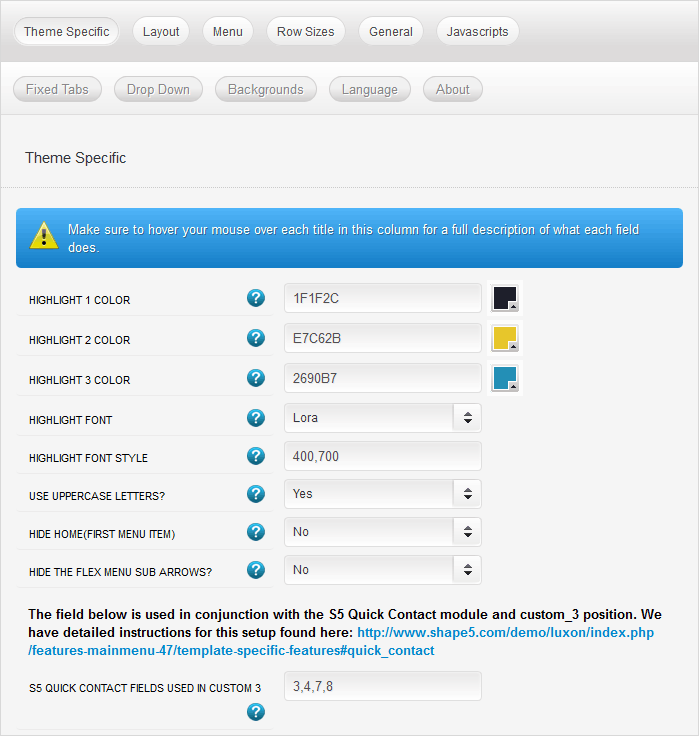
Every theme built on Vertex also comes with its own unique theme specific options applicable to that particular theme such as highlight colors, social icons, and much more. These features are in addition to the standard functions of Vertex, and are still controlled through the very user friendly interface of Vertex. This page will document the features specific to this template.
Theme Specific Configuration Interface of Vertex
Below is a screenshot that shows all the theme specific features available in the user friendly Vertex admin:
Custom Highlight Colors
Stylize your site with any color you want. Set your own custom color scheme with the built in highlight colors. These control menu items, titles, buttons, hover over effects, backgrounds, and much more. You can set this color to any color that you want. Below is an example so you can see how this works.
Custom Highlight Font
Choose a custom highlight font powered by Google fonts. You can set a custom font for the titles, buttons, and much more. This is used in conjunction with the default site font which is controlled under the Layout tab of Vertex, and controls many other elements as well.
Uppercase Letters
Choose to enable or disable uppercase letters on most menu items, buttons, titles and more.

Hide First Menu Item and Arrows
With this option you can disable the first menu item and also the sub menu arrows.
S5 Quick Contact Popup and Controller
The S5 Quick Contact is heavily customized to work with this theme for reservations. Along with the widget there is a controller area, which allows the user to first select a few inputs and then those inputs are passed into the S5 Quick Contact widget to complete the form and submit it. That controller is shown below:
When the button in the controller area is clicked the S5 Quick Contact opens in an overlay screen that covers the site.
You can also open the S5 Quick Contact by adding onclick="s5_custom_7_open()" to any element. Click on the Reserve Now button below for an example.
What Are You Waiting For? Reserve Now
Setup Process:
1. Publish the S5 Quick Contact widget to the Custom 7 position to all pages. This will not actually show on the page, this position is only contained in the overlay area that covers the site when triggered. Configure the widget as desired.
2. Publish the controller code to any widget position in a text widget or clean markup widget, on the demo it is published to Custom 3 position.
<div id="s5_quick_contact_controller">
<a class="readon" onclick="s5_custom_7_open()">Check Room Availability</a>
</div>
<a class="readon" onclick="s5_custom_7_open()">Check Room Availability</a>
</div>
3. In the theme configuration you need to define which fields from the S5 Quick Contact widget that you would like to show in the controller area. Enter the number of the fields you would like to show separated by commas. For example if I want to show the second, fifth and seventh fields, I would enter 2,5,7 in this field.

4. If you would like to add a button that opens the overlay area you can simply add onclick="s5_custom_7_open()" to any element. The Reserve Now button shown above uses the following code:
<div class="highlight1_block_outer">
<div class="highlight1_block">
<span>What Are You Waiting For?</span> <a onclick="s5_custom_7_open()" class="readon">Reserve Now</a>
</div>
</div>
<div class="highlight1_block">
<span>What Are You Waiting For?</span> <a onclick="s5_custom_7_open()" class="readon">Reserve Now</a>
</div>
</div>
S5 Accordion Menu
KEOR Hotel / Features / Theme Specific Features
Contact Us
Address Information
123 Meyers Street
Bigtownville, CO 56021
Bigtownville, CO 56021
Desk Hours
6AM to 11PM
Monday through Sunday
Monday through Sunday
Contact Us
stpeters@keor.nl
Tel. 1.800.555.1212
Tel. 1.800.555.1212
S5 Box – Login
Publish a login form or anything you want to this position.
S5 Box – Register
Publish a registration form or anything you want to this position.
Copyright © 2018. KEOR Hotels & Resorts.
Room Booking
Thanks for staying with us! Please fill out the form below and our staff will be in contact with your shortly. The see all of our room options please visit the link below.
See All Rooms
See All Rooms


